

A free part closure wig is one of the most versatile wig options for achieving a natural and flexible hairstyle. Unlike fixed-part wigs, a free part closure allows you to change your parting direction as often as you like, giving you more control over your final look.
For many people, learning how to construct a closure wig at home is both cost-effective and practical. With the right materials and a clear process, you can create a wig that looks polished, natural, and suitable for everyday wear.
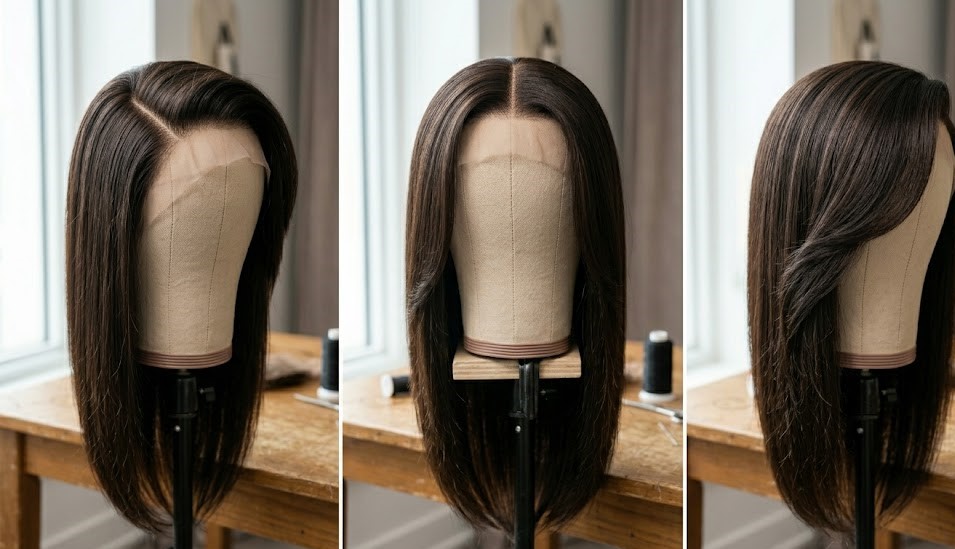
What Is a Free Part Closure?
A free part closure is a lace closure that allows flexible parting within the ventilated area, enabling styles such as middle and side parts. Instead of being designed for a single fixed part, it gives more styling flexibility.
This makes it a preferred option for people who want versatility without having to purchase multiple wigs.
Key advantages of a free part closure include:
-
- Flexible styling options
-
- Natural-looking scalp appearance when properly installed
-
- Beginner-friendly construction process
-
- Suitable for different face shapes and occasions
What Is the Difference Between a Closure and a Frontal?
A closure and a frontal are both used to create natural-looking wigs, but they differ in size, coverage, and styling flexibility.
A closure typically covers a smaller portion of the front of the wig and is designed for simpler installation and maintenance. It is ideal for beginners and everyday wear styles.
A frontal, on the other hand, extends from ear to ear and allows for more styling versatility, including full ponytails and deeper parting options. However, it is more advanced to install and maintain.
For most beginners, a free part closure is a more practical option because it offers a balance between natural appearance and ease of use.
Materials You Will Need to Make a Free Part Closure Wig
Before starting, prepare all your materials to ensure a smooth workflow.
Hair components
-
- 1 free part lace closure
-
- 2–3 bundles of hair (depending on desired fullness and length)
Tools and equipment
-
- Wig cap (mesh or dome cap)
-
- Mannequin head
-
- T-pins
-
- Curved sewing needle
-
- Weaving thread
-
- Scissors
-
- Tail comb
-
- Hot comb or flat iron
-
- Hair wax stick
-
- Spray bottle with water

Step-by-Step Guide to Making a Free Part Closure Wig
-
- Position and Secure the Closure
The first step is preparing the foundation.
Place your wig cap securely on a mannequin head and smooth out any wrinkles or folds. Once the cap is sitting properly, position the free part closure at the front of the wig cap where the hairline will be.
As you pin the closure into place, pay close attention to how the lace lays against the cap. The goal is to keep it smooth and flat without creating air bubbles or bunching. A well-positioned closure immediately makes the rest of the construction process easier.
Many experienced wig makers also leave a small amount of lace extending beyond the front edge of the cap. This extra lace can help create a more natural-looking hairline once the wig is installed and customised.
After checking that everything is aligned correctly, use T-pins to secure the closure firmly in place. Once you’re satisfied with the positioning, you’re ready to move on to the most important part of the foundation: sewing the closure onto the cap.
-
- Sew the Closure and Build the Foundation
Using your curved needle and weaving thread, begin sewing around the perimeter of the closure. Work carefully and keep your stitches evenly spaced to ensure the closure remains flat against the wig cap.
A locking stitch is often recommended because it helps prevent shifting and provides long-term durability. While it may be tempting to move straight to the bundles, securing the closure first creates a stronger foundation and helps ensure the rest of the wig is balanced and symmetrical.
Once the closure is fully sewn down and sitting comfortably against the cap, the framework of your wig is complete. The next step is adding the bundles that will create the volume, length, and shape of your finished style.
-
- Sew the Hair Bundles Into Place

Begin at the nape area of the wig cap and work your way upward toward the closure. As you sew, follow the natural curve of the head by creating smooth, curved rows rather than perfectly straight lines.
This curved placement helps the wig sit more naturally and contributes to a better overall shape once styled.
As you reach the edges of the cap, consider using the flip-over method instead of cutting the weft after each row. This technique involves folding the track over and continuing in the opposite direction.
Many wig makers prefer this approach because it:
-
- Reduces shedding
-
- Preserves bundle density
-
- Creates flatter tracks
-
- Extends the lifespan of the wig
Continue filling the cap until you’ve reached the closure area. As you work, periodically check for gaps between tracks. Consistent spacing will help create a fuller appearance and prevent the wig cap from showing through.
Once all the bundles have been installed, you’ll finally be able to see the shape of the wig coming together.
-
- Reveal the Closure and Create a Natural Scalp Appearance
At this stage, the wig construction is nearly complete.
Turn the wig inside out and locate the section of cap material directly beneath the closure. Using sharp scissors, carefully remove this section of the cap while avoiding the lace itself.
When you remove the cap material underneath the closure, the lace becomes visible and can better mimic the appearance of a natural scalp.
With the construction finished, the focus now shifts from building the wig to customising and styling it.
How To Customise and Style Your Free Part Closure Wig

-
- Create Your Desired Part
One of the biggest advantages of a free part closure is the freedom to style it however you like.
Lightly mist the closure area with water and use a tail comb to create your preferred parting line. Whether you prefer a classic middle part, a soft side part, or a dramatic deep side part, the closure allows you to experiment until you find the look that suits you best.
Because the hair isn’t restricted to a fixed parting pattern, you can always switch things up later without needing a completely different wig.
-
- Achieve a Flat, Professional Finish
After establishing your part, the next goal is creating a polished finish.
Apply a small amount of wax stick along the roots and use a hot comb to gently press the hair flat. This simple technique helps eliminate flyaways, smooth bulky roots, and define the parting area.
The result is a cleaner, more professional appearance that closely resembles the way natural hair lays against the scalp.
Work slowly and use moderate heat to avoid unnecessary damage to the hair. Often, a few careful passes with the hot comb are all that’s needed to transform the look of the wig.
Common Mistakes to Avoid
Even experienced wig makers encounter mistakes from time to time, but being aware of common issues can help you avoid frustration.
-
- Sewing Tracks Too Close Together
-
- Packing tracks too tightly can create unnecessary bulk and make the wig feel heavier than it needs to be. Consistent spacing typically produces a more natural result.
-
- Cutting the Lace Too Early
-
- Many beginners rush to trim the lace before construction is complete. Waiting until the wig is fully assembled allows you to make more accurate adjustments later.
-
- Over-Plucking the Closure
-
- Customisation is important, but excessive plucking can leave the closure looking sparse and unnatural. It’s always easier to remove more hair later than it is to replace it.
-
- Using Excessive Heat
-
- While hot tools are useful for styling, too much heat can reduce the lifespan of both the closure and the bundles. Use only the amount of heat necessary to achieve your desired look.How many bundles are needed for a closure wig?
-
Most closure wigs require 2 to 3 bundles depending on the desired length and volume.
FAQS
-
Can beginners make a closure wig?
Yes. With patience and proper guidance, beginners can successfully construct a closure wig.
Do I need a sewing machine?
No. Hand sewing is the most common method for making closure wigs.
How long does a closure wig last?
With proper maintenance, a good-quality closure wig can last for several months or longer.