
Let’s be honest: getting your knotless braids installed is actually only half the battle. The real work begins when you have to keep them fresh, clean, and neat weeks down the line. Because knotless braids start directly with your natural hair at the root, your scalp is fully exposed to all the sweat, grease, and dirt from everyday styling products like your edge control or styling gels.
Naturally, many people completely avoid washing their hair because they are terrified of ruining the attachment or creating instant, uncontrollable frizz. However, letting dirt sit on your scalp will only cause intense itching, heavy dandruff, and severe hair breakage when it is finally time to take them down.
Fortunately, caring for your braids doesn’t have to be stressful at all.
Let’s look at the exact steps to wash your braids safely, dry them properly, and manage a simple night routine to make your hairstyle last for weeks.
How to Sleep with Knotless Braids to Stop Overnight Frizz
Truth be told, friction is the number one enemy of neat braids.
When your head rubs against rough cotton pillowcases at night, it pulls at your hair strands and creates that annoying, fuzzy halo at your roots.
To prevent this, you need to protect your hair before bed with this simple nightly routine:
- First, Tie Your Lines with a Satin Scarf: Wrap a silk or satin scarf tightly around your front hair and your parts. This keeps the roots completely flat and prevents your natural hair from lifting.
- Tuck In A Jumbo Bonnet: Gather the long length of your attachment and slide gently into a large satin bonnet. Never sleep on loose braids if you want to avoid early frizz.
- Ditch Heavy Hair Cream and Grease: It is tempting to pack heavy hair oil, blue grease, or castor oil onto your scalp when it feels dry. Avoid this entirely. The truth is, heavy products act like dust magnets, trapping dirt and causing white patches at your roots. Instead, try using a light commercial spray like Nature’s Gentle Touch Natural Hair Spray, or simply mist your scalp with a DIY mix of water and a few drops of peppermint oil in a small spray bottle once or twice a week.
How to Wash Braids Safely: 4 Step-by-Step Scalp Care Tips
When it’s time to wash knotless braids, your main focus should always be your scalp, not the long body of the attachment. Follow this process carefully to get a clean wash without causing any frizz:
Step 1: Dilute Your Shampoo
First things first, never pour thick shampoo directly onto your head. It is incredibly difficult to rinse out from the centre of a braid. Instead, take an empty plastic applicator bottle (or an old squeeze bottle), fill it halfway with water, add a few squirts of a clarifying shampoo (like Mega Growth, Cantu, or ORX), and shake it well. This creates a soapy liquid that easily penetrates your parts.
Step 2: Target Your Lines
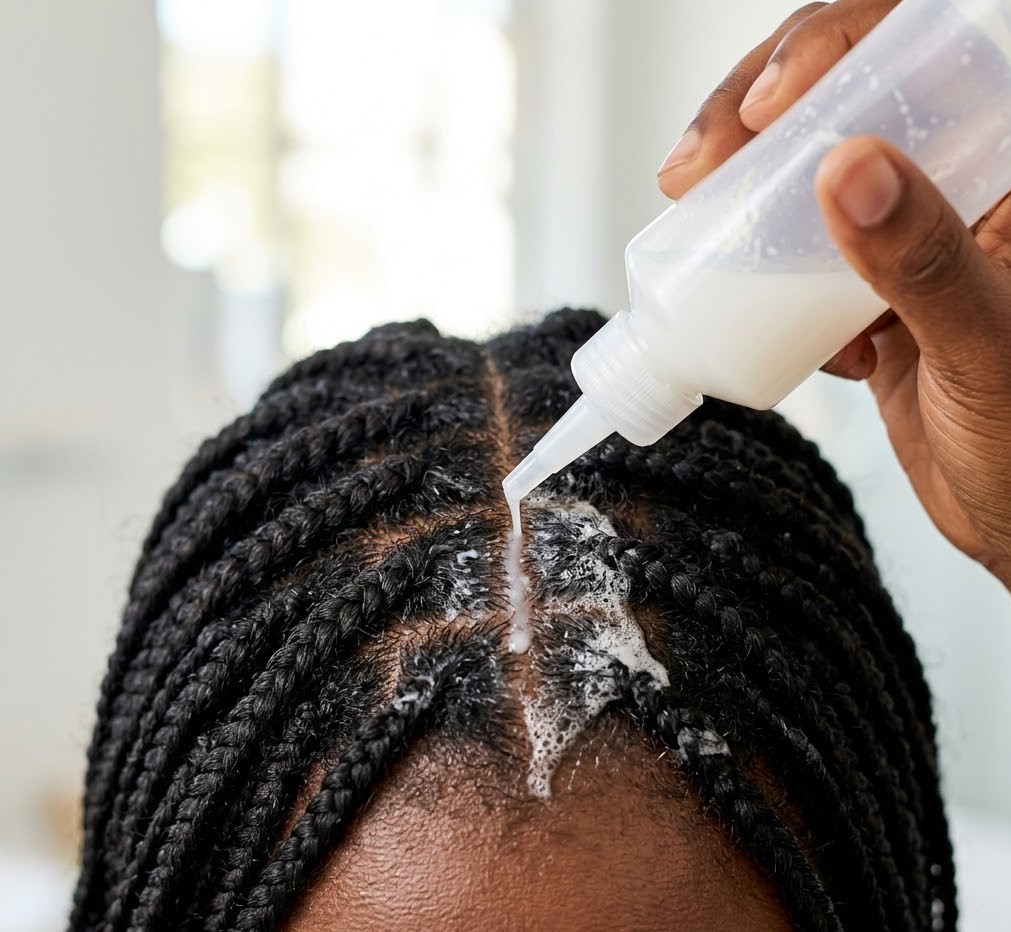
Next, squeeze the soapy mixture directly along your lines and parts. Use the pads of your fingers instead of your fingernails to gently massage your scalp. Focus heavily on your hairline and the crown of your head, where sweat and heavy edge controls like Barracuda or Mega Growth Gel pack up the most. Be careful not to rub or scrub the braids back and forth, because your natural hair will pop out of the attachment immediately if you do.
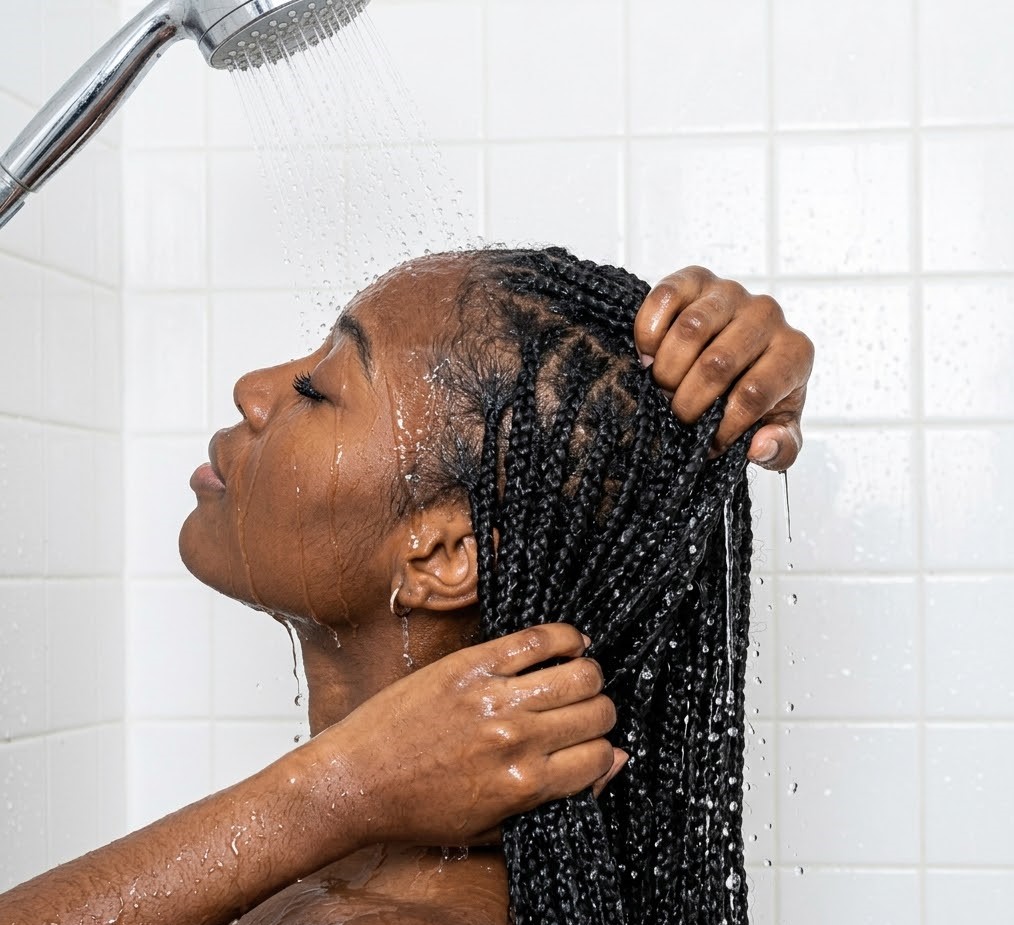
Step 3: Rinse From Scalp to Ends
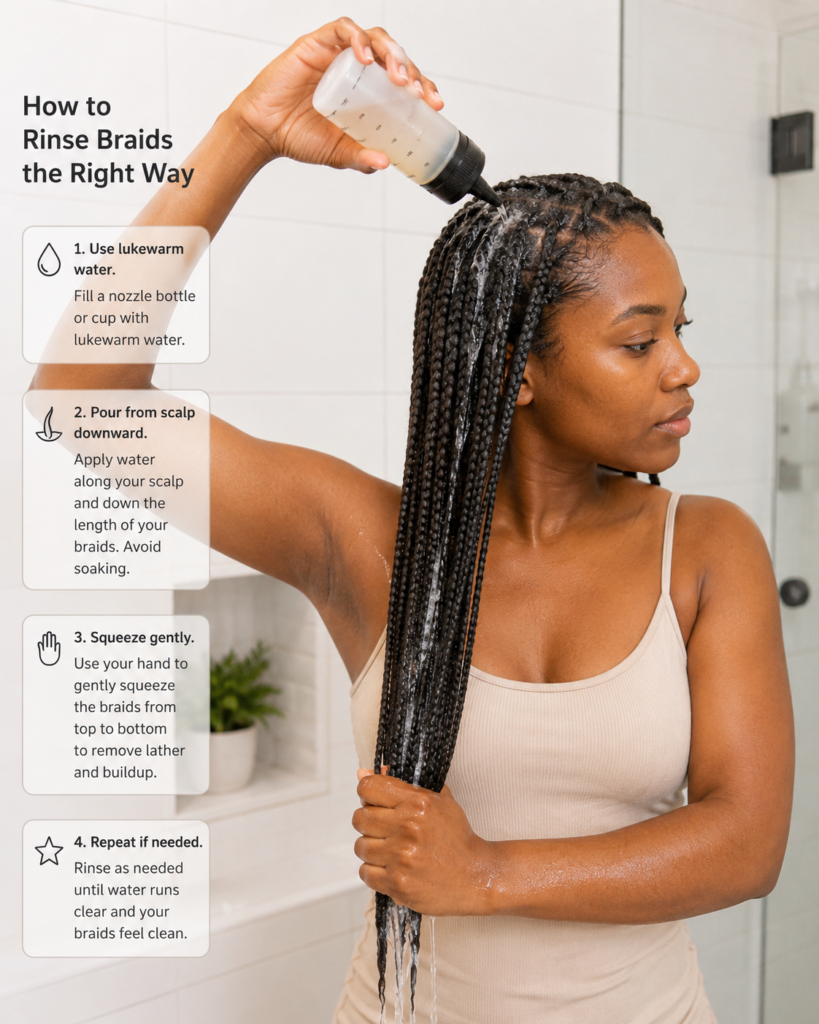
Once you’re done washing, use a cup or a bottle with a nozzle to pour lukewarm water from your scalp downward, letting it flow naturally to the ends of your braids. Avoid standing directly under a forceful showerhead as this can oversaturate your braids and cause frizz. You can gently squeeze the braids from top to bottom to help move the lather down, and continue rinsing until the water runs completely clear.
Step 4: Condition from the Middle Down
Now, here is a crucial rule: do not apply conditioner to your roots. Conditioner softens the hair and gives it slip, which will make your knotless attachment slide right off your natural hair. Instead, rub the conditioner only from the middle of the braid down to the tips. This keeps the attachment looking shiny and fluid. Finally, rinse it out completely with cool water.
How to Dry Knotless Braids Fast and Prevent Damp Smell
Now, let’s talk about the drying process, because drying your braids properly is arguably the most important step of all. If you pack your wet hair into a bun or go to sleep while the roots are still damp, you are trapping moisture against your scalp. Ultimately, this causes your braids to develop that sour, musty “damp cloth” smell, creates a severe itchy scalp, and ruins your new growth.
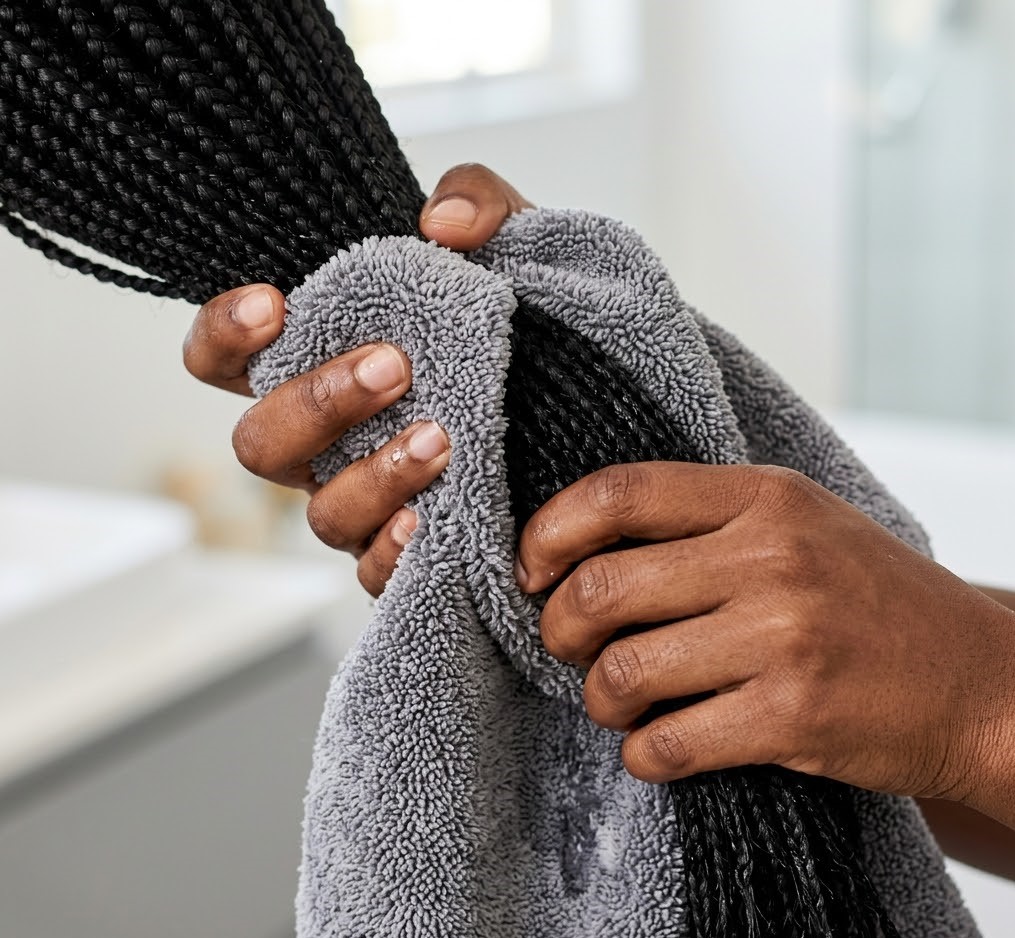
- Squeeze with a Towel: Start by gathering your braids in sections and squeezing them firmly with a dry towel to remove excess water. Just make sure you do not rub the towel hard across your head.
- Blow-Dry Thoroughly: After that, sit under a salon hood dryer, or use a handheld blow dryer on a warm setting. Direct the air downwards, focusing heavily on the roots until they are completely bone-dry.
- The Frizz Reset: Once your hair is completely dry, apply a generous amount of wrap setting mousse (like Olive Oil Ors Mousse) across your scalp and down the length of the braids. Tie your hair down tightly with your scarf for 15 minutes. This mousse essentially resets the style and smoothens down any stray hairs that lifted during the wash.
While knotless braids are an excellent protective style, they are definitely not meant to stay on your head forever. As a general rule, you should carry your braids for a maximum of 8 to 10 weeks.
Leaving them for longer than this could cause your shed hair to lock and mat around the base of the attachment, forming hard knots mixed with dirt and dried sweat.
So, if you notice your braids sagging heavily, a lot of dirt forming at the root, or your natural hair tangling together, it is definitely time to take them down.
Also, forcing them to stay longer means you risk experiencing traction alopecia, accidentally cutting your own natural hair, or pulling it out from the roots when trying to comb out those stubborn dirt balls.
FAQs
Why do my knotless braids itch so badly?
The intense itching usually comes from a dry scalp or a mild allergic reaction to the chemical preservative coating used on synthetic attachment packs. If it is itching right after installation, use a soothing scalp spray. For your next hair appointment, consider soaking your Lush Hair or Darling attachment in a warm water and apple cider vinegar mix to wash off that chemical layer before the stylist touches your hair.
How often should I wash knotless braids?
Ideally, you should aim to wash your braids every 2 to 3 weeks. Washing them every single week is unnecessary and will make your hair look old quickly. On the flip side, leaving them unwashed for over a month allows sweat, dead skin, and edge control to clog your scalp, which can stunt your hair growth.
How do I keep my knotless braids from frizzing when I sleep?
Frizz happens when your hair rubs against rough pillows. The absolute best way to stop this is to tie your roots down with a satin scarf and pack the length into a jumbo bonnet. If your bonnet always falls off at night, buy a satin pillowcase to use as a backup.
What is the white stuff at the root of my braids?
That white stuff is simply product buildup mixed with dried sweat and dead skin. It usually happens when you use too much heavy hair cream, gel, or edge control without washing it out. You can gently clear it between washes by cleaning your lines with a damp cotton pad soaked in warm water and a little shampoo.
Can I put hair oil on my scalp while wearing knotless braids?
Yes, but stay away from thick hair oils or heavy hair grease because they just sit on the scalp, clog your pores, and trap dust. Instead, use lightweight oils that soak into the skin easily, like jojoba, sweet almond, or tea tree oil, and apply them sparingly using an applicator bottle only once or twice a week.