


Wigs have become a beauty essential for women who love versatility, protective styling, and effortless glam. But if you’ve ever worn a braided wig that felt bulky, uncomfortable, or didn’t sit properly on your head, the problem might not be the wig itself, it might be the wig cap. Learning how to make a braided wig cap can completely transform the way your braided wigs look and feel.
Many beginners assume that wig making requires professional skills or expensive tools, but the truth is that creating a braided wig cap at home is surprisingly simple.
With a few affordable materials and a little patience, you can create a cap that fits your head perfectly and makes your braided wigs look neat, natural, and comfortable. Plus, DIY wig caps allow you to customize the size, stretch, and durability of the cap to suit your personal needs.
In this detailed tutorial, you will learn how to make a braided wig cap step by step, even if you are a complete beginner. From choosing the right materials to sewing the cap and ensuring the perfect fit, this guide will walk you through everything you need to know. By the end, you’ll have the confidence to create a sturdy and comfortable wig cap that makes your braided wigs look professionally made.
What Is a Braided Wig Cap?
Before diving into the DIY process, it’s important to understand what a braided wig cap actually is and why it plays such a crucial role in wig making.
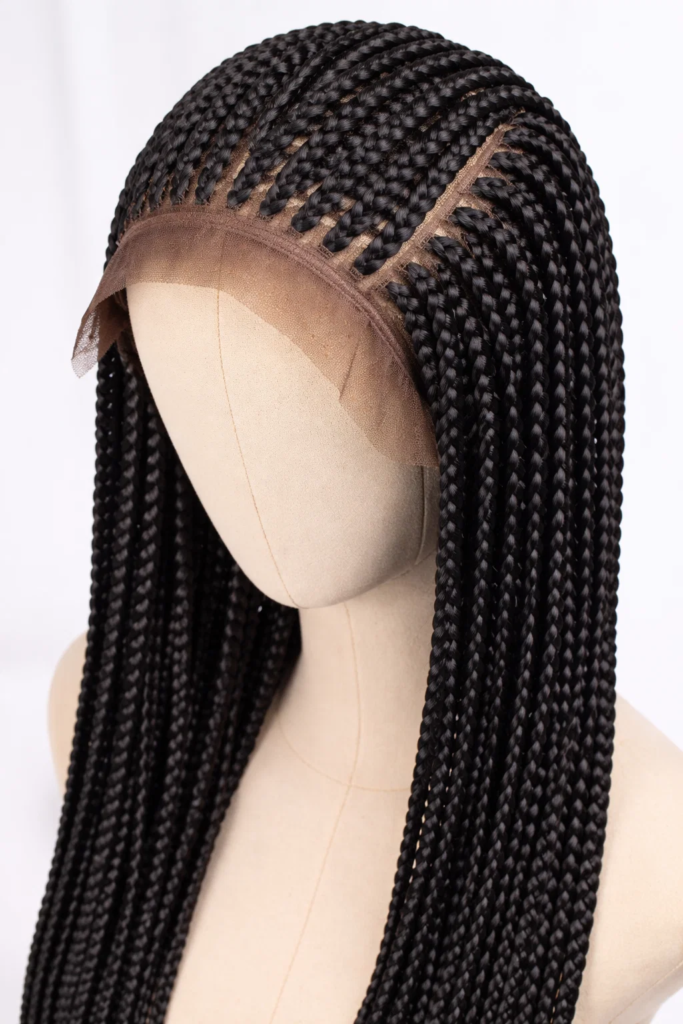
A braided wig cap is the foundation used to create braided wigs. It serves as the base where the braids or extensions are attached, helping the wig maintain its shape while ensuring a secure fit on the wearer’s head. Without a proper wig cap, braided wigs can feel heavy, uneven, or unstable.
Unlike regular wig caps used for lace wigs, braided wig caps are typically stronger and more durable because they must support the weight of synthetic or human hair braids. The cap also needs to be breathable so that the wearer remains comfortable throughout the day.
A well-made braided wig cap offers several benefits, including:
- Providing a secure base for attaching braids.
- Helping the wig fit comfortably on the head.
- Preventing the wig from slipping or shifting.
- Supporting the weight of braids or extensions.
- Improving the overall durability of the wig.
Understanding the role of the wig cap will help you appreciate why learning how to make one properly is so important.
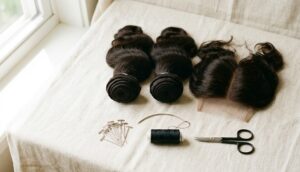
Materials Needed to Make a Braided Wig Cap
Before you begin the DIY process, it’s helpful to gather all the materials you’ll need. Having the right tools nearby makes the process easier and helps you achieve better results.
Fortunately, most of the materials required to make a braided wig cap are affordable and easy to find in beauty supply stores or online.
Common materials used include:
- Dome wig cap or stretchable wig cap
- Mannequin head or wig stand
- Needle and strong thread
- Measuring tape
- Fabric scissors
- Elastic band
- T-pins for securing the cap
- Marker or chalk for marking sections
A dome cap is often preferred for braided wigs because it is thicker and more durable than regular stocking caps. It also provides better support for the braids, ensuring the wig lasts longer.
Once you have these materials ready, you can begin preparing the wig cap.
How to Measure Your Head for a Perfect Wig Cap Fit
Getting the right measurements is one of the most important steps when learning how to make a braided wig cap. A properly measured cap ensures the wig fits comfortably without feeling too tight or too loose.
Start by using a measuring tape to measure the circumference of your head. Place the tape around your hairline, beginning at the front of your forehead and wrapping it around to the back of your head. This measurement helps determine the size of the wig cap you need.
Next, measure from the front hairline to the nape of your neck. This ensures the cap covers the entire head properly. You may also want to measure from ear to ear across the top of your head.
Important measurements include:
- Head circumference
- Front hairline to nape length
- Ear-to-ear measurement
- Temple-to-temple measurement
Taking accurate measurements helps you create a braided wig cap that fits securely and feels comfortable during long wear.
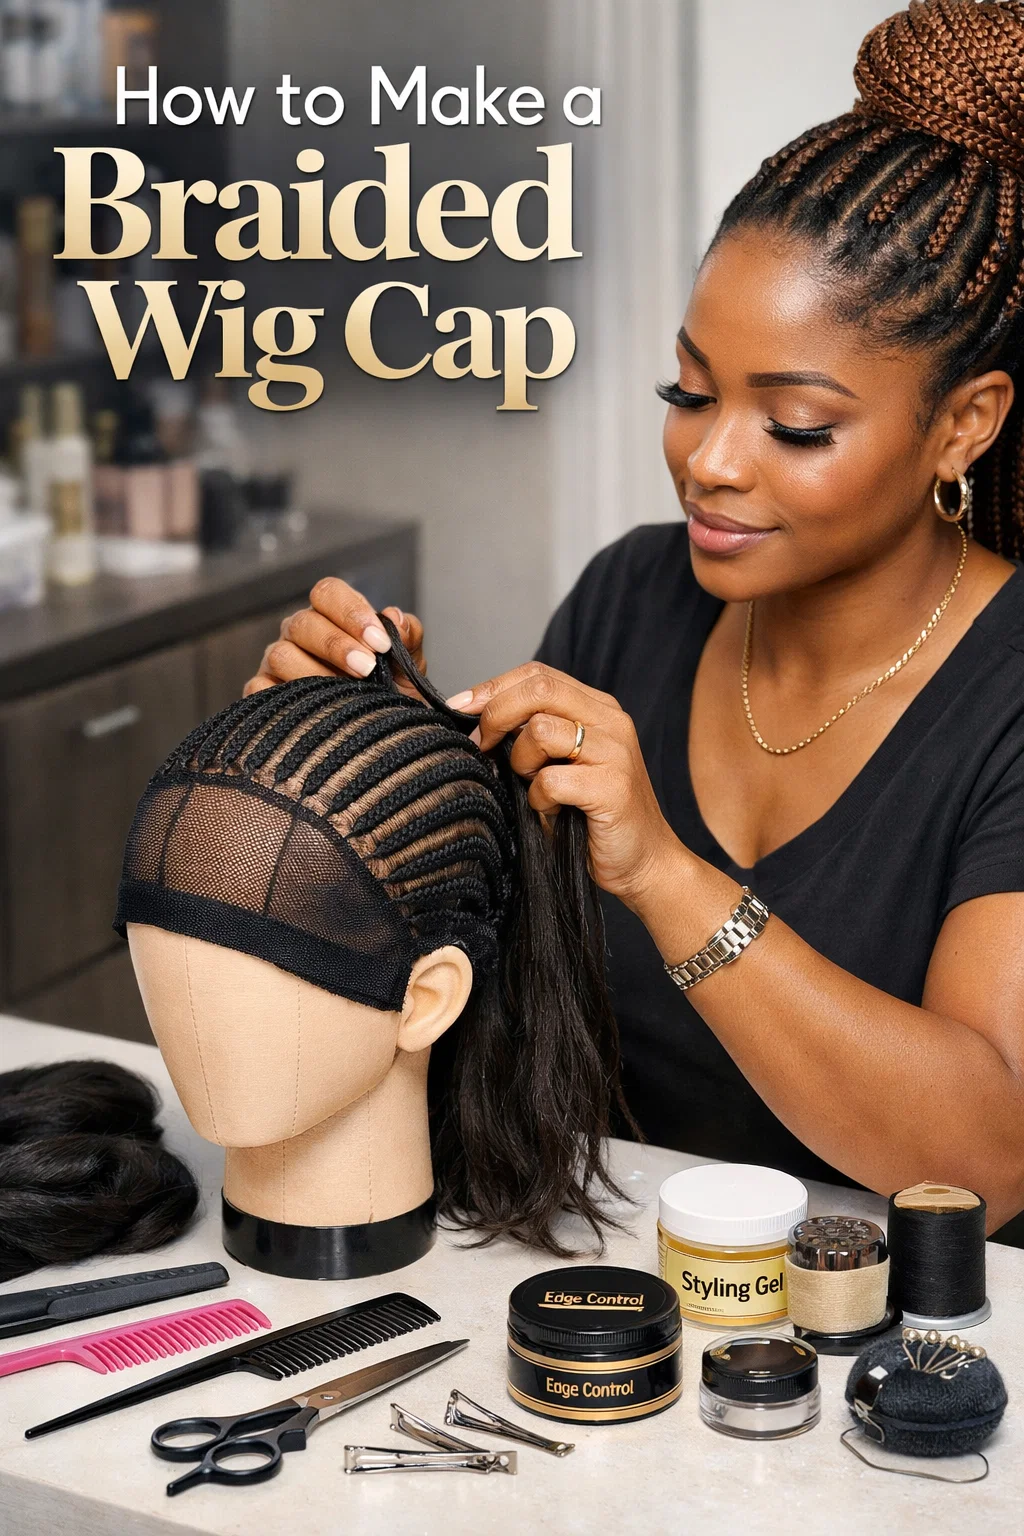
Step-by-Step Guide on How to Make a Braided Wig Cap
Learning how to make a braided wig cap step by step makes the process much easier, especially for beginners. By following a structured method, you can create a strong and well-fitting wig cap that serves as the perfect base for your braided wig.
Start by placing your dome cap on a mannequin head. Use T-pins to secure the cap tightly so it does not move while you work. This step is important because it helps you maintain the correct shape while sewing and adjusting the cap.
After securing the cap, you can begin adjusting it to match your head measurements. This may involve tightening certain areas or adding elastic bands to improve the fit.
Basic steps for making a braided wig cap include:
- Place the dome cap on a mannequin head
Secure the cap with T-pins so it stays firmly in place while you work. - Mark important sections on the cap
Use a marker or chalk to mark areas such as the hairline and parting sections. This helps guide where the braids will be attached later. - Sew an elastic band for extra support
Attach an elastic band around the back of the cap to ensure the wig fits snugly and does not slip off your head. - Reinforce the cap with strong stitching
Use a needle and strong thread to reinforce areas that will carry the weight of the braids. - Check the fit and adjust if necessary
Try the cap on your head to ensure it fits comfortably. Make adjustments if needed before adding the braids.
Following these steps carefully helps create a durable and comfortable wig cap that supports braided hairstyles.

Tips for Making a Durable Braided Wig Cap
Creating a braided wig cap is not just about sewing fabric together, it’s also about ensuring the cap lasts long and holds the braids securely.
One of the most helpful tips is choosing a high-quality dome cap. Thin caps may tear or stretch easily under the weight of braids, which can reduce the lifespan of your wig.
Another important tip is reinforcing the stitching in areas where tension will be highest, such as the nape and sides of the cap.
Helpful durability tips include:
- Use strong nylon thread instead of regular thread.
- Avoid caps that are too thin or fragile.
- Reinforce areas where braids will be attached.
- Ensure the cap is tight but comfortable.
- Double-stitch important seams for extra strength.
These small details can make a big difference in the durability of your braided wig.
Common Mistakes to Avoid When Making a Braided Wig Cap
While learning how to make a braided wig cap, beginners often make mistakes that can affect the final result. Being aware of these mistakes can help you avoid frustration and create a better wig cap.
One common mistake is choosing the wrong cap size. A cap that is too small can feel uncomfortable, while a cap that is too large may slide around on your head.
Another mistake is skipping the measurement process. Accurate measurements are essential for creating a wig cap that fits properly.
Other mistakes include:
- Using weak thread that breaks easily
- Not securing the cap properly on the mannequin head
- Skipping reinforcement stitching
- Making the cap too tight
- Forgetting to test the fit before adding braids
Avoiding these mistakes will make your wig-making process smoother and more successful.
Benefits of Making Your Own Braided Wig Cap
Learning how to make a braided wig cap at home offers several advantages compared to buying pre-made caps. DIY wig caps give you more control over the design, size, and comfort of your wig.
One major benefit is customization. You can adjust the cap to match your exact head size and preferred level of tightness. This helps ensure maximum comfort and stability.
Another advantage is cost savings. Making your own wig cap is often cheaper than buying professionally made wig bases.
Other benefits include:
- Creating a perfect custom fit.
- Saving money on wig-making supplies.
- Improving the durability of your braided wigs.
- Learning valuable wig-making skills.
- Having full control over the wig design.
For anyone interested in wig making, mastering this skill is a valuable step.
Frequently Asked Questions (FAQ)
What is a braided wig cap?
A braided wig cap is the base or foundation used to create a braided wig. It is typically made from a durable dome cap or stretchable fabric that holds the braids securely in place.
The cap ensures that the wig fits comfortably on the head while supporting the weight of the braids or hair extensions.
What materials do I need to make a braided wig cap?
To make a braided wig cap, you will need a few basic materials that are easy to find. These include a dome wig cap, mannequin head or wig stand, needle and strong thread, elastic band, measuring tape, scissors, and T-pins.
These tools help you secure the cap properly and create a strong foundation for attaching braids.
Can beginners make a braided wig cap at home?
Yes, beginners can definitely make a braided wig cap at home. The process is simple and does not require professional hairstyling experience.
By following a step-by-step tutorial, measuring your head correctly, and using the right materials, you can create a comfortable and durable wig cap even if it’s your first time.
How long does it take to make a braided wig cap?
The time it takes to make a braided wig cap depends on your experience level. For beginners, the process may take about 30 minutes to an hour. As you gain more experience, you will likely be able to make a wig cap much faster.
What type of wig cap is best for braided wigs?
A dome cap is usually the best option for braided wigs. Dome caps are thicker and more durable than regular stocking caps, which helps them support the weight of braids. They also provide a snug fit that helps keep the wig secure and comfortable.
How do I make sure my braided wig cap fits properly?
To ensure a proper fit, start by measuring your head accurately using a measuring tape. Measure the circumference of your head, the distance from the front hairline to the nape, and the ear-to-ear length. These measurements will help you adjust the wig cap and add elastic bands if necessary for a secure fit.
Can I wash a braided wig cap?
Yes, braided wig caps can be washed, especially if they are part of a braided wig. Use mild shampoo and lukewarm water to clean the cap and allow it to air dry. Regular cleaning helps maintain hygiene and prolongs the lifespan of the wig.
Why is a strong wig cap important for braided wigs?
A strong wig cap is important because braided wigs can be heavy due to the extensions used. A durable cap prevents tearing, maintains the shape of the wig, and ensures the braids stay securely attached. This helps the wig last longer and remain comfortable to wear.
Is making a braided wig cap cheaper than buying one?
Yes, making your own braided wig cap is usually more affordable than purchasing a pre-made wig base. DIY wig caps allow you to use inexpensive materials while customizing the cap to fit your head perfectly, saving money in the long run.
Where can I get quality products for braided wigs and styling?
If you want high-quality hair products, styling tools, or ready-made wigs, brands like Twinkles Beauty offer a variety of beauty solutions. Using reliable beauty products can help improve the durability, appearance, and overall styling experience of your braided wigs.
Make a Braided Wig Cap From Your Home
Learning how to make a braided wig cap is a simple but powerful skill for anyone who loves braided wigs or wants to start making their own. A well-made wig cap serves as the foundation for a beautiful and durable braided wig, ensuring that the final hairstyle looks neat, secure, and comfortable to wear. When the base of your wig is properly constructed, the braids sit better, the wig fits more naturally, and the overall look becomes much more polished.
With the right materials, accurate measurements, and careful stitching, even beginners can create a high-quality braided wig cap at home. As you practice and improve your skills, you’ll find that making your own wig caps becomes easier and more enjoyable. In the end, the effort you invest will reward you with a perfectly fitting wig base that enhances both the look and comfort of your braided wigs.
If you prefer professionally crafted wigs or need high-quality beauty products for styling and wig care, Twinkles Beauty is a great brand to explore. Known for its stylish hair solutions and beauty essentials, Twinkles Beauty offers products that help women achieve flawless hairstyles with ease. Whether you’re making your own braided wig cap or styling a finished wig, having the right beauty brand by your side can make the entire process smoother and more glamorous.
How To Make a Wig With Closure: A Complete DIY Beginner’s Guide
Making a wig with closure is one of the most
Popular Short Wig Styles For Every Lady
Short wig styles are popular for many reasons. They are