
How to Make a Bob Wig with a 360 Lace Closure: A Complete Beginner’s Guide
Bob wigs are one of those styles that never really

Making a wig with closure is one of the most practical beginner wig-making skills because it gives you a natural hairline without requiring advanced lace work. It’s also a protective styling option and can be fully customised in terms of length, volume, and texture.
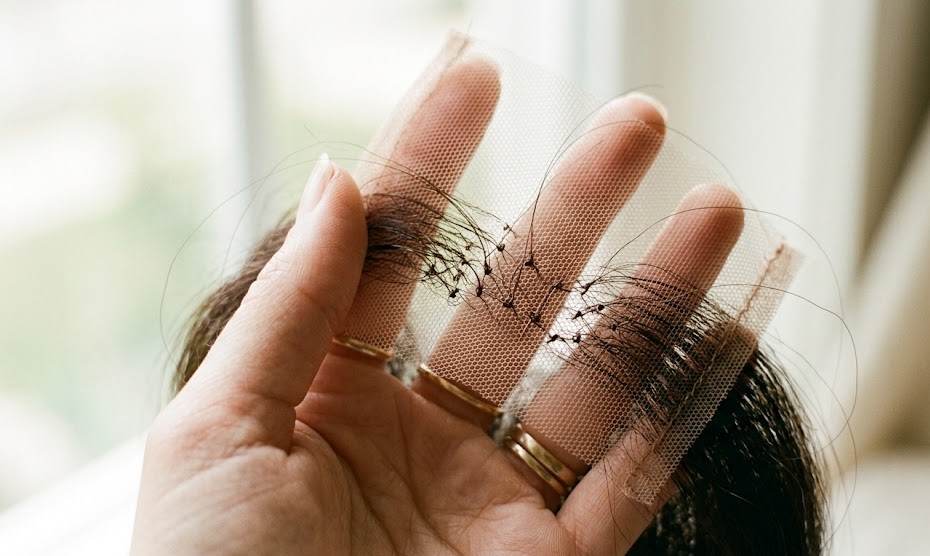
A lace closure is a small piece of lace (usually 4×4 inches or 5×5 inches) with hair strands knotted directly into it. It looks like a natural scalp and sits at the top of the wig where you’d normally part your hair.
Because the hair comes through the lace rather than sitting on a solid base, it creates a seamless, skin-like appearance that blends naturally with your hairline.
Wig closures come in different sizes, textures (straight, body wave, deep wave, kinky curly), and lace shades (transparent, medium brown, dark brown).
The goal is to match your closure’s texture and lace tone as closely as possible to your bundles and your skin.
A 4×4 closure is the most popular choice for beginners. It’s smaller, easier to sew in cleanly, and covers the crown well. A 5×5 closure, on the other hand, gives you more lace coverage, which means you can part the hair in more directions and create a fuller-looking frontal area. Since this is your first time making a wig with closure, start with a 4×4 closure size, it’s more forgiving.
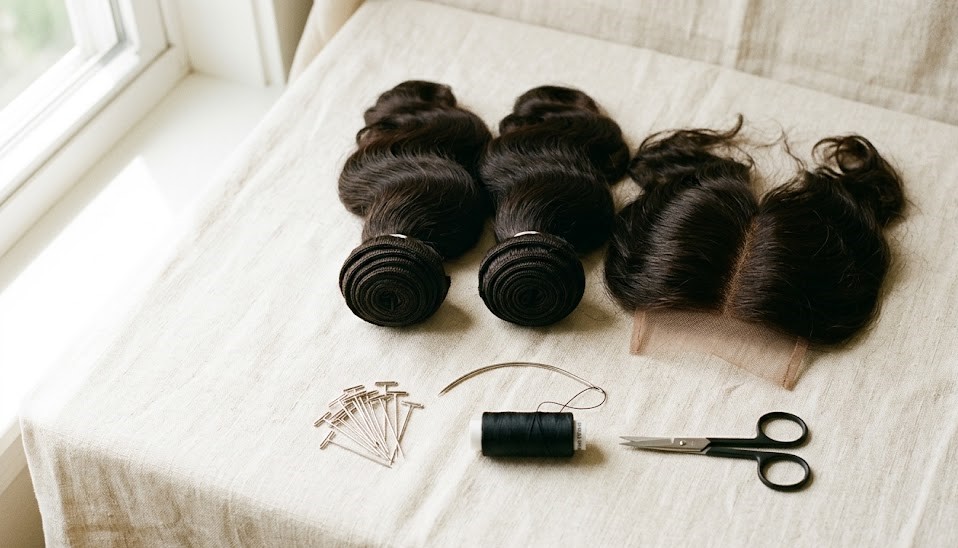
Here’s a full list of everything you need to make a wig with closure at home:
How many bundles do you need to make a wig with closure? For hair lengths up to 14 inches, 2 bundles are usually enough. For anything longer than 16 inches, go with 3 bundles to achieve full, natural-looking density.
Pro tip: Buy from the same batch. When ordering your bundles and closure, try to get them from the same supplier and the same hair batch. This ensures the texture, colour, and sheen all match perfectly without any extra effort.
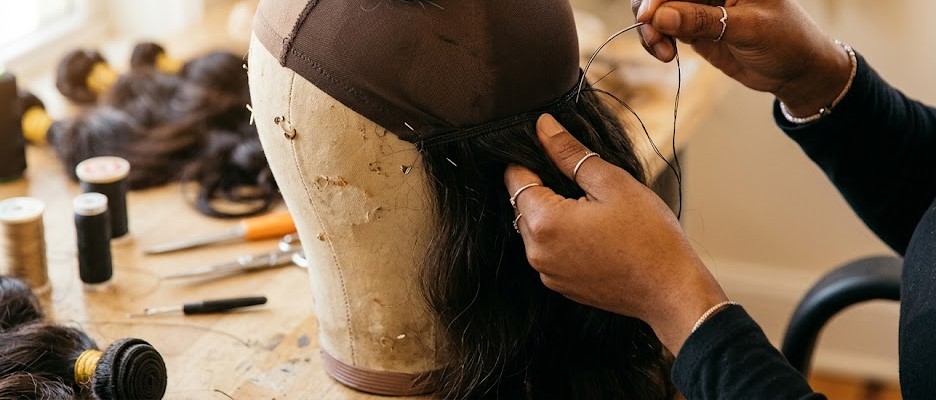
Start by placing your wig cap over the canvas head and pulling it down so it fits snugly, with no bunching or loose areas. Use T-pins around the perimeter to hold it firmly in place. This step matters a lot because if the cap shifts while you’re sewing, your rows will end up uneven.
Use a dome cap if you can. It has a more rounded, head-like shape than a flat mesh cap and gives you a better foundation for natural-looking wefts.
Once the cap is secure, take your fabric pencil and lightly draw a hairline at the front. This gives you a boundary so you don’t accidentally sew wefts too far forward.
Start at the nape of the neck, which is the very bottom of the cap.
This is your first row. Lay the weft along the cap and sew it in using a running stitch: bring the needle up through the cap, over the weft, and back down.
Repeat this all the way along the row, keeping the stitches tight and close together (about 1cm apart).
When you reach the end of the row, knot the thread securely before cutting. Never leave an unknotted end, or it will unravel over time.
Work your way upward, row by row. As you get toward the crown, the cap curves more steeply. Shorter or slightly angled wefts work better here than a single long strip.
Keep rows roughly 1cm apart, close enough that no scalp shows between them. Stop about 3–4 inches from the top of the cap, as this space is reserved for the closure. Trim the weft neatly at the ends and don’t leave raw edges.
It’s best to use a curved weaving needle that lets you loop around the weft and through the cap in one smooth motion. It’s much less awkward than a straight needle on a rounded surface.
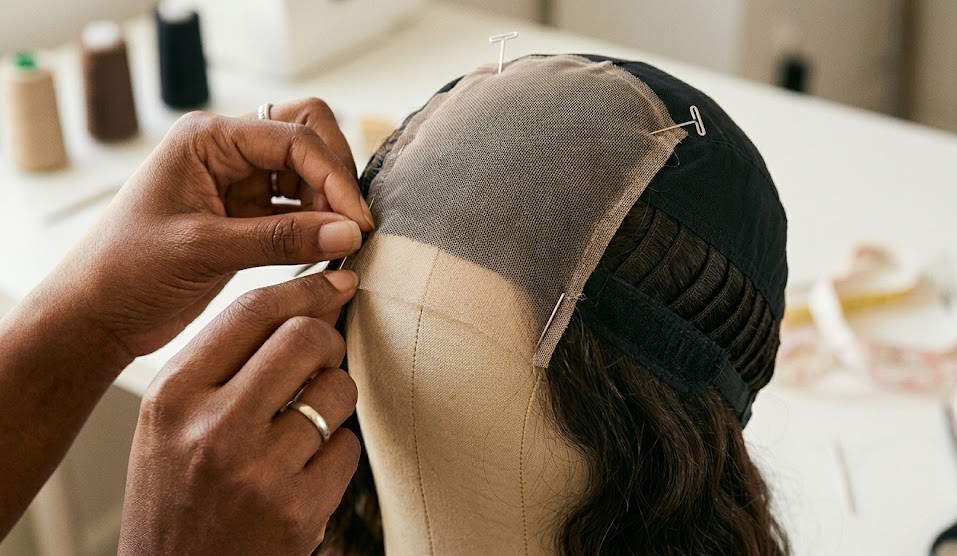
Next, you want to place the closure at the top of the wig, hair-side down against the cap, covering the open area left by the last few rows of wefts.
Make sure it sits flat and centred. Pin all four corners with T-pins before you sew a single stitch. This prevents the closure from shifting while you work.
Sew around the perimeter of the closure using a whip stitch: bring the needle up through both the lace and the cap, loop over the edge, and repeat. Work slowly and keep the stitch even. Go around all four sides.
Once the closure is sewn in, carefully trim any excess lace that extends beyond the wig cap. Use small, sharp scissors. The keyword here is carefully, if you cut too close to the knots, the hair will start shedding.
One thing to note when making a wig with closure is that lace closures have dark knots at the base of each hair strand. These knots are visible and make the closure look obviously artificial. Bleaching them lightens the knots so they blend with the lace, creating a more natural scalp effect.
Mix a small amount of developer and bleach powder into a thick paste. Apply it gently onto the underside of the lace (not the hair side) using a soft brush. Leave it on for 15–20 minutes, then rinse thoroughly and let the closure dry completely before sewing it in. Keep a close eye on it, over-bleaching weakens the hair and causes breakage.
Note that it is completely fine to skip bleach as a beginner, especially if you’re not sure. Instead, use a concealer or foundation in your skin tone on the lace after installation. Press it gently into the lace using a makeup sponge. It won’t last as long as bleached knots, but it’s quick and effective.
Remove the wig from the canvas head. Try it on and check the fit, adjust the elastic band or sew in combs for a more secure hold if needed.
Now blend the closure hair with the weft hair using a flat iron or curling wand. Even if both are the same texture, heat styling unifies the look and removes any visible difference between the two. Work section by section, starting from the closure and moving outward.
Apply a small amount of edge control gel along your hairline, pressing the baby hairs down flat with a soft toothbrush or edge brush. This step alone makes a huge difference. It’s what separates a wig that looks “on” from one that looks like it grew there.
When you’re done, use a rat-tail comb to create a clean part through the closure. Apply a light oil such as argan or castor to add shine and reduce frizz, and trim a few face-framing layers if the length feels blunt.
Making a wig with a closure takes patience the first time.
Start with quality materials, take your time on the closure attachment, and don’t skip the finishing details. The result is a wig that looks and feels like it was made just for you. Because it was.
And if you’d rather just buy a ready-made wig and skip the hassle, check out our collection of stylish, high-quality wigs and enjoy hassle-free deliveries in Nigeria, Ghana and across Africa when you place an order.
How many bundles do I need for a full wig with closure? For lengths up to 14 inches, 2 bundles are usually enough. For 16 inches and longer, use 3 bundles. If you want extra thickness or volume, a third bundle always improves density.
What’s the difference between a closure and a frontal? A closure (4×4 or 5×5) covers just the crown area and works best with a fixed part. A frontal is a larger piece that stretches ear to ear and gives you more styling versatility, but it’s harder to install and usually costs more. Closures are the better starting point for beginners.
Do I need to bleach the knots? No, it’s optional, but highly recommended if you want the most natural look. Unbleached knots appear as small dark dots on the lace. If you’d rather skip the chemical process, pressing a skin-toned concealer into the lace achieves a similar result temporarily.
How do I stop the wig from shedding? Shedding usually happens at the weft or near the knots on the closure. For wefts, apply a thin line of fabric glue along the track before sewing. For the closure, avoid over-bleaching the knots and don’t cut the lace too close to the base of the hair strands.
Can I use any sewing needle? You can use a straight needle, but a curved weaving needle makes the job much easier on a rounded cap. The curve lets you loop the stitch smoothly without constantly repositioning your hand. It’s a small investment that saves real frustration.
How long will a handmade wig last? With proper care, regular conditioning, gentle washing, and storing on a wig stand, a well-made closure wig can last 12–18 months or longer. The longevity depends on the hair quality and how often you apply heat.
Bob wigs are one of those styles that never really

Kinky curly hair extensions have become a favourite choice among
Let’s talk seduction for a hot minute, ladies… A truly
Get exclusive beauty tips, product launches, and special offers directly to your inbox.
We use cookies to improve your experience on our site. By using our site, you consent to cookies.
Manage your cookie preferences below:
Essential cookies enable basic functions and are necessary for the proper function of the website.
These cookies are needed for adding comments on this website.
Statistics cookies collect information anonymously. This information helps us understand how visitors use our website.
SourceBuster is used by WooCommerce for order attribution based on user source.